(Note: This seems to work for me. NO Guarantees!)
Testing Drivers for Design
I use a specific procedure for measuring drivers that may differ somewhat from those used by others. It works for me. This single setup method does a good job of handling diffraction and baffle step issues for the individual speaker design. It also means that measurements from one design are not easily used with an alternative box or a different combination of drivers.
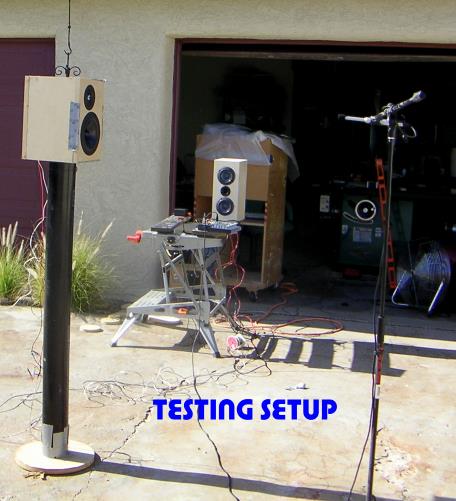 |
I design
the boxes and install all the drivers, ports and stuffing. Lately I've
been using a baffle that includes rabetted driver cutouts. Since
I primarily use biscuits, it's easy to duct tape the test baffle to the
box. I wire each driver separately. This tower mount is probably better for MTMs and on calm days wind wise
I do my testing outdoors. For "bookshelf" speakers, I mount them on a stand about 4.5 feet high. The mic is set up roughly 1 meter, (40") away. Usually, I place the mic on the same horizontal plane as the tweeter with the speaker rotated a few degrees off axis. Towers are measured on the ground. I bought a cheap laser level to help with the alignment process. This up high method is designed to get rid of all spurious reflections and ground bounce. It gets impractical with big boxes. I think ground plane setups work just as well for most boxes and is considerably easier to setup. You are supposed to tilt the box so sighting across the box top points directly at the microphone. In practice being off a bit on the angle doesnt drastically change the results. |
For calibrating the sound card, I take the speaker output directly to the line in, set the levels, and calibrate at various sample rates and lengths. When you get a good calibration file ("Justmls.cal") make a backup. I've trashed mine a couple of times.
I've found setting the sampling to 44,100 with 8192 as the MLS sample length seems to be the best compromise. Typical window lengths of 7 to 30 ms seem to give me the best results. I use the tweeter to establish the reference volume level for all tests. With 2 channel, you need to set the levels first.
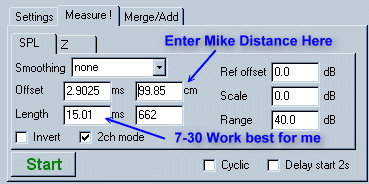 Enter the distance between the mike and the baffle in the "Offset"
box, then press "Test". Next check the Time Domain window, make
sure the spikes lines-up at left. (Ingemar covers this in the users guide).
You may need to tweak the offset distance a bit. If you use this single
point setup, you may need to adjust the mike distance for each driver.
Make sure choose the (Ch 1-2) value for your measures. Export
your measurements frequently. If you change scaling or smoothing, these
appear to be reflected in the measurement files.
Enter the distance between the mike and the baffle in the "Offset"
box, then press "Test". Next check the Time Domain window, make
sure the spikes lines-up at left. (Ingemar covers this in the users guide).
You may need to tweak the offset distance a bit. If you use this single
point setup, you may need to adjust the mike distance for each driver.
Make sure choose the (Ch 1-2) value for your measures. Export
your measurements frequently. If you change scaling or smoothing, these
appear to be reflected in the measurement files.
With the initial calibration done, I now measure the tweeter. Using the same mic setup and volume levels, I then measure each of the other drivers. Typically I push the test button several times until I'm convinced that the measurements aren't significantly changing. (Using these Lengths the sub 200 Hz area is not accurately measured) I usually save a set unsmoothed, and a set with 1/6 or 1/12 smoothing for design. I also use Snagit from Techsmith to capture some screen shots for reference.
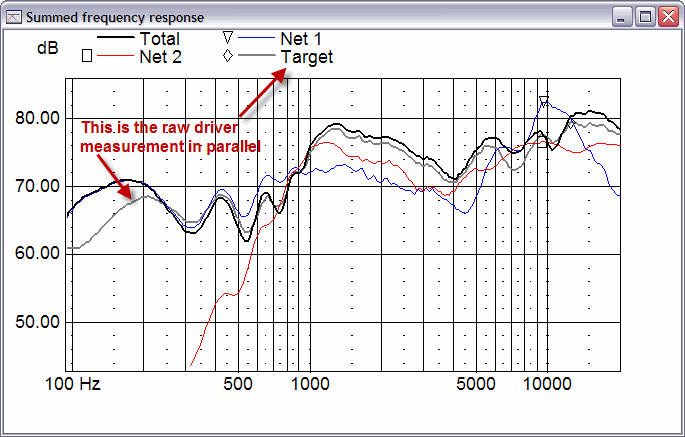
Once each driver is measured individually, I take a final measurement with all drivers in parallel. This curve will used as an initial "target" value in LspCad. By tweaking the XYZ locations of individual drivers to match the the "target" curve, I can make sure the acoustical centers of the drivers are properly modelled. If you use the same sound levels for everything, LspCad will handle approximate tweeter padding. This single point system also includes baffle step and edge diffraction effects.
For MTM designs, I use a single point directly on the horizontal axis of the tweeter. Then I treat both woofers as a single driver. I give the tweeter and woofers the the same "Y" position on the baffle. For towers, I may supplement the far field woofer measurements, by splicing in a near field measurement -- to eliminate ground bounce. I find this more important in 3 way designs where the ground effects may be in the crossover region.
After, measuring (and saving) all of FR data. I then measure the impedance of each driver IN THE BOX (using an 8 ohm mills resistor) This captures the effects of port/box loading. I find the woofer tester 3 to give very close results to LspCad for design purposes, so I usually use the WT3.
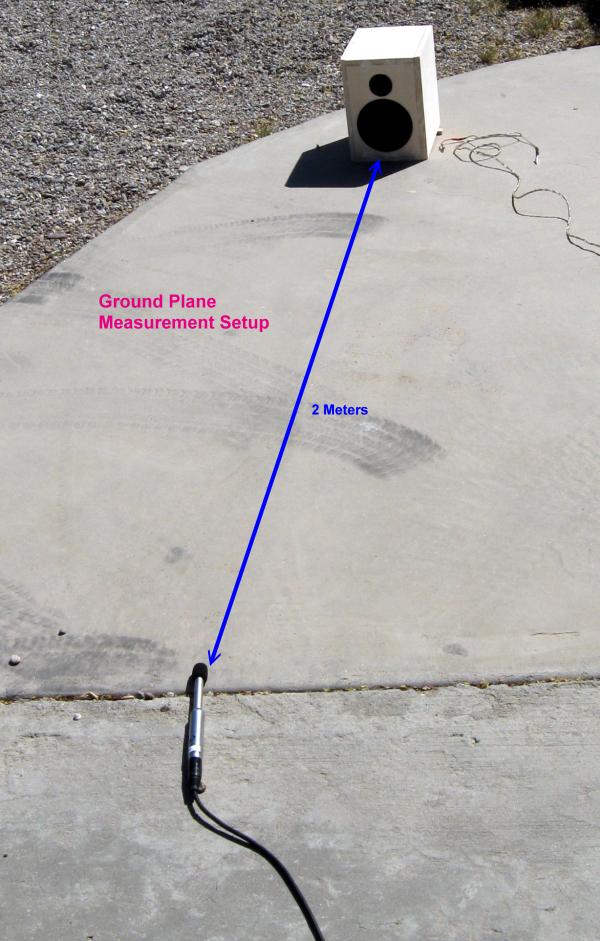
For finished speakers, I typically do a ground plane measurement on the concrete of the driveway with the mic at about two meters.
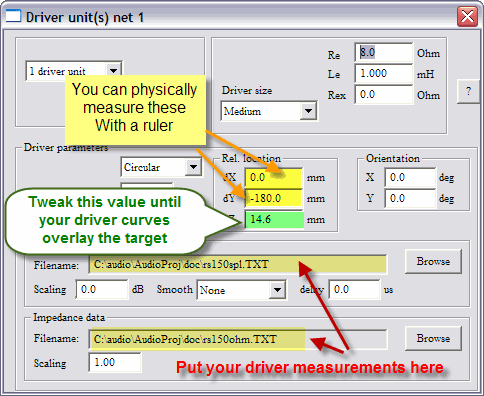 |
How To Use Your Measurements in LspCad For a simple TM you should have SPL curves for the woofer, the tweeter, the woofer & tweeter in parallel, plus impedance files for each of the drivers. I typically use the center of the tweeter as coordinate 0,0,0. The shot here shows the woofer. You can add real values for dX and dY. They are relative to the center of the tweeter. What we're after is the acoustic offset of the drivers dZ. That's why we took the woofer + tweeter in parallel. We will use that as our intitial target curve in the General Settings. Pick that W+T file as your target curve. Use your actual measuring distance in the indicated field |
 |
You only need to include the crossover range here. No tweeter will be doing 50Hz. No mid will hit 20,000Hz.
|
Now go back up to the woofer properties screen above. Start trying different values of dZ. If everything works out right you should get your target and real driver curves to line up. (You may need to mess with the offset to get them to overlay) |
If you've got everything lined up nicely then you are ready to begin crossover design. Since you did all the measurements yourself you don't have to worry about phase extraction, bafflestep compensation, edge diffraction or normalizing curves from different sources. It's already acounted for in your measurements! (Now do you see why I do it this way?)
MY TESTING GEAR (NEW AND OLD)
Update July 2009,
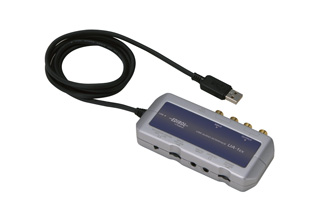
The old Win 98 box gave up the magic smoke so I'm now using my old Thinkpad laptop with an Edirol UA-1EX USB sound card.
I also bought a the Dayton EMM-6 Microphone as my Behringer has been brutalized over the years. And added a Woofer Tester 3 to my arsenal.
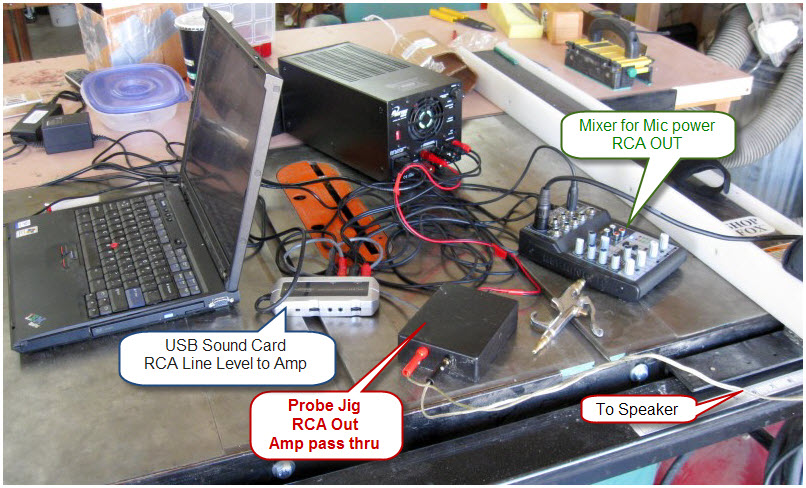
I redesigned my probes so I now have a single jig. Amp output to my jig box. Probe resistors inside, dump the signal to my soundcard via RCA jack. There are banana plugs to the amp, banana jacks for the speaker wire. Now only one cable goes from the testing area to the speaker.
My CheckList For Measuring. Your process may vary
- Create a folder for all the measurements
- Hook up the amp, laptop, soundcard. Make sure soundcard is switched to Standard Settings and all volumes set to minimum
- Hook up the amp input to soundcard /output to measuring jig. Make sure the amp volume is at minimum and powered off
- Set up the mixer and microphone. Turn on phantom power, make sure all equalizer settings are at 12:00
- Set up Mic & cable. String amp leads from the jig box to the speaker
- Open Windows Sounds to verify the soundcard is the default device
- Turn on the amp. Start by testing windows wav files and slowly turn the amp up until the level is audible
- Open JustMLS in testing mode, set to two channel mode, and appropriate burst length
- Test levels and fiddle with soundcard input volumes and mixer gain settings until both are "in the green"
- Set the listening gate length and distance to driver in JustMLS
- Measure the tweeter and redjust the levels and mic distance measurement to get cleanest phase; save the file, and save to JustMLS memory.
- Connect: the Mid, measure; the woofer; measure; save results to text file after each measurement, use Snagit for screen capture. (Leave the microphone in a single spot.)
- Wire tweet in parallel with mid, measure; wire mid in parallel with woofer; measure (these are used to determine relative acoustic centers)
- Take a nearfield on the woofer and merge it (if necessary)
- Verify all files have been saved and screen shots captured
- Use the Woofer tester to measure impedance on each driver; export after each measurement
- Copy folder to memory stick
Older Setup with a Desktop
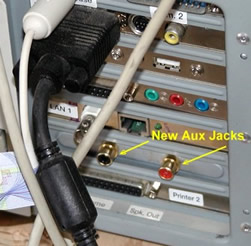
Most of my initial frustrations with JustMLS were traced to a funky jack on the line level input of my sound card. I drilled out a "blank" on my computer case (where all the cards are plugged in) and mounted two rca jacks in it. I soldered a CD-to-soundcard cable to the jacks, and plugged it in to the auxillary pins on my Soundblaster 16 sound card. Now I use rca patch cords for all of connections. I've found this more reliable than soundcard jack.
Though I no longer use a desktop, those of you who do might find this to be a lot easier on your soundcard jacks.
 I
started out using a Wallin jig, Panasonic DIY mikes, and Eric Wallin's
battery powered mic preamp. They worked OK but took a lot of futzing to
get everything right. When I accidently touched speaker leads, I fried
the jig which in turn fried my shop receiver. So I decided to step up
to a low hassle solution. Wallin
Jig 2 And Wallin Mike Preamp I think I had about $60 into this
setup, but it seems like it always took me an hour to get things working
right.
I
started out using a Wallin jig, Panasonic DIY mikes, and Eric Wallin's
battery powered mic preamp. They worked OK but took a lot of futzing to
get everything right. When I accidently touched speaker leads, I fried
the jig which in turn fried my shop receiver. So I decided to step up
to a low hassle solution. Wallin
Jig 2 And Wallin Mike Preamp I think I had about $60 into this
setup, but it seems like it always took me an hour to get things working
right.
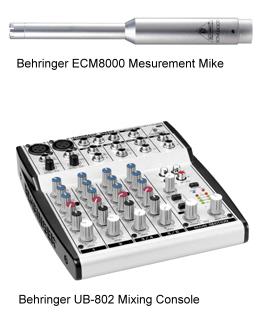
I now use the Behringer ECM-8000 measurement microphone (about $50). I find it clean and durable. Throw in a mike stand, 20 foot cable for about $30.
The mike needs a phantom power source. I looked around for cheap amps but the best solution seemed to be the UB-802 mixing console. ($60) This allows a bit more flexiblity and an adjustable gain control. I've also used the console for mastering audio tracks from vinyl and narrating videos.
I also built two sets of probes with the resistors built into the ends. With alligator clips on one end and an RCA jack on the other. I used 20 ft lengths of two conductor, shielded, 20 ga cable I found at a surplus store. I soldered an alligator clip to a mills 8 ohm resistor for doing impedance. You'll also need one patch cord with an RCA to 1/4" mic plug to get from the mixer to the computer. I can setup in about 10 minutes.